Friday, December 18, 2009

virtual box + linux + shared folder

after adding it to the shared folder at from the bottom right side option.

Windows folder
scan = c:\scan


mounting it on the linux side ( assumed that you have the guest plug in installed)

create a folder on the linux where you want to mount this stuff to

sudo mkdir /mnt/share

Mount the drive:

sudo mount -t vboxsf scan /mnt/share

Un - mount :

sudo umount -t vboxsf /mnt/share/

- Mihir Patel.


Thursday, December 17, 2009

Solution : projects\connectfour\build.xml:46: Unable to find a javac compiler; com.sun.tools.javac.Main is not on the classpath. Perhaps JAVA_HOME

make sure you are bale to execute the javac from command line.
[basically you need to have the "C:\Program Files\Java\jdk1.6.0_16\bin" included in you path]

or following user variable

JAVA_HOME = C:\Program Files\Java\jdk1.6.0_16

copy the tools.jar from C:\Program Files\Java\jdk1.6.0_16\lib folder to cruisecontrol\apache-ant-1.7.0\lib

This should do the Job

- Mihir Patel

Friday, December 4, 2009

word to wiki convertor macro

Using the Macro :

It is translated to TiddlyWiki from Word2Wiki by RobertCastley: as posted onto WikiMedia's Meta-wiki page. go to http://meta.wikimedia.org/wiki/Word_macros#Word2TWiki for the original and the instructions there.

To use it, you must first load it as a word macro:
    * copy the vba script below into a text editor and then save it as
Word2TiddlyWiki.bas
    * Open your word document and then hit Alt+F11.
    * Then select File -> Import File.
    * Select the file you have just saved.
    * Close the Visual Basic screen.
to run the macro:
    * Block the text you want to convert
    * Then in your Word document select Alt+F8.
    * The converter will do its job and should automatically copy the
conversion into the clipboard.
    * All you then need to do is to paste into your editor in
TiddlyWiki.


Code :--- VBA

Sub Word2TiddlyWiki()

    Application.ScreenUpdating = False

    'Convert Headers
    ConvertH1
    ConvertH2
    ConvertH3
    ConvertH4
    ConvertH5
   
    'Convert fonts
    ConvertItalic
    ConvertBold
    ConvertUnderline

    ' todo: Add ConvertTables

    ' Copy to clipboard
    ActiveDocument.Content.Copy

    Application.ScreenUpdating = True
End Sub

Private Sub ConvertH1()
    Dim normalStyle As Style
    Set normalStyle = ActiveDocument.Styles(wdStyleNormal)

    ActiveDocument.Select

    With Selection.Find

        .ClearFormatting
        .Style = ActiveDocument.Styles(wdStyleHeading1)
        .Text = ""

        .Format = True
        .MatchCase = False
        .MatchWholeWord = False
        .MatchWildcards = False
        .MatchSoundsLike = False
        .MatchAllWordForms = False

        .Forward = True
        .Wrap = wdFindContinue

        Do While .Execute
            With Selection
                If InStr(1, .Text, vbCr) Then
                'mark newline
                    .Collapse
                    .MoveEndUntil vbCr
                End If
               
                'don't mark newline
                If Not .Text = vbCr Then
                    .InsertBefore "!"
                End If

                .Style = normalStyle
            End With
        Loop
    End With
End Sub

Private Sub ConvertH2()
    Dim normalStyle As Style
    Set normalStyle = ActiveDocument.Styles(wdStyleNormal)

    ActiveDocument.Select

    With Selection.Find

        .ClearFormatting
        .Style = ActiveDocument.Styles(wdStyleHeading2)
        .Text = ""

        .Format = True
        .MatchCase = False
        .MatchWholeWord = False
        .MatchWildcards = False
        .MatchSoundsLike = False
        .MatchAllWordForms = False

        .Forward = True
        .Wrap = wdFindContinue

        Do While .Execute
            With Selection
                If InStr(1, .Text, vbCr) Then
                'mark newline
                    .Collapse
                    .MoveEndUntil vbCr
                End If

                'don't mark newline

                If Not .Text = vbCr Then
                    .InsertBefore "!!"
                End If

                .Style = normalStyle
            End With
        Loop
    End With
End Sub

Private Sub ConvertH3()
    Dim normalStyle As Style
    Set normalStyle = ActiveDocument.Styles(wdStyleNormal)

    ActiveDocument.Select

    With Selection.Find

        .ClearFormatting
        .Style = ActiveDocument.Styles(wdStyleHeading3)
        .Text = ""

        .Format = True
        .MatchCase = False
        .MatchWholeWord = False
        .MatchWildcards = False
        .MatchSoundsLike = False
        .MatchAllWordForms = False

        .Forward = True
        .Wrap = wdFindContinue

        Do While .Execute
            With Selection
                If InStr(1, .Text, vbCr) Then
                'mark newline
                    .Collapse
                    .MoveEndUntil vbCr
                End If

                'don't mark newline

                If Not .Text = vbCr Then
                    .InsertBefore "!!!"
                End If

                .Style = normalStyle
            End With
        Loop
    End With
End Sub
Private Sub ConvertH4()
    Dim normalStyle As Style
    Set normalStyle = ActiveDocument.Styles(wdStyleNormal)

    ActiveDocument.Select

    With Selection.Find

        .ClearFormatting
        .Style = ActiveDocument.Styles(wdStyleHeading3)
        .Text = ""

        .Format = True
        .MatchCase = False
        .MatchWholeWord = False
        .MatchWildcards = False
        .MatchSoundsLike = False
        .MatchAllWordForms = False

        .Forward = True
        .Wrap = wdFindContinue

        Do While .Execute
            With Selection
                If InStr(1, .Text, vbCr) Then
                'mark newline
                    .Collapse
                    .MoveEndUntil vbCr
                End If

                'don't mark newline
                If Not .Text = vbCr Then
                    .InsertBefore "!!!!"
                End If

                .Style = normalStyle
            End With
        Loop
    End With
End Sub
Private Sub ConvertH5()
    Dim normalStyle As Style
    Set normalStyle = ActiveDocument.Styles(wdStyleNormal)

    ActiveDocument.Select

    With Selection.Find

        .ClearFormatting
        .Style = ActiveDocument.Styles(wdStyleHeading3)
        .Text = ""

        .Format = True
        .MatchCase = False
        .MatchWholeWord = False
        .MatchWildcards = False
        .MatchSoundsLike = False
        .MatchAllWordForms = False

        .Forward = True
        .Wrap = wdFindContinue

        Do While .Execute
            With Selection
                If InStr(1, .Text, vbCr) Then
                'mark newline
                    .Collapse
                    .MoveEndUntil vbCr
                End If

                'don't mark newline
                If Not .Text = vbCr Then
                    .InsertBefore "!!!!!"
                End If

                .Style = normalStyle
            End With
        Loop
    End With
End Sub

Private Sub ConvertBold()
    ActiveDocument.Select

    With Selection.Find

        .ClearFormatting
        .Font.Bold = True
        .Text = ""

        .Format = True
        .MatchCase = False
        .MatchWholeWord = False
        .MatchWildcards = False
        .MatchSoundsLike = False
        .MatchAllWordForms = False

        .Forward = True
        .Wrap = wdFindContinue

        Do While .Execute
            With Selection
                If InStr(1, .Text, vbCr) Then
                'mark newline
                          .Font.Bold = False
                    .Collapse
                    .MoveEndUntil vbCr
                End If

                'don't mark newline
                If Not .Text = vbCr Then
                    .InsertBefore "''"
                    .InsertAfter "''"
                End If

                .Font.Bold = False
            End With
        Loop
    End With
End Sub

Private Sub ConvertItalic()
    ActiveDocument.Select

    With Selection.Find

        .ClearFormatting
        .Font.Italic = True
        .Text = ""

        .Format = True
        .MatchCase = False
        .MatchWholeWord = False
        .MatchWildcards = False
        .MatchSoundsLike = False
        .MatchAllWordForms = False

        .Forward = True
        .Wrap = wdFindContinue

        Do While .Execute
            With Selection
                If InStr(1, .Text, vbCr) Then
                'mark newline
                    .Font.Italic = False
                    .Collapse
                    .MoveEndUntil vbCr
                End If

                'don't mark newline
                If Not .Text = vbCr Then
                    .InsertBefore "//"
                    .InsertAfter "//"
                End If

                .Font.Italic = False
            End With
        Loop
    End With
End Sub

Private Sub ConvertUnderline()
    ActiveDocument.Select

    With Selection.Find

        .ClearFormatting
        .Font.Underline = True
        .Text = ""

        .Format = True
        .MatchCase = False
        .MatchWholeWord = False
        .MatchWildcards = False
        .MatchSoundsLike = False
        .MatchAllWordForms = False

        .Forward = True
        .Wrap = wdFindContinue

        Do While .Execute
            With Selection
                If InStr(1, .Text, vbCr) Then
                'mark newline
                    .Font.Underline = False
                    .Collapse
                    .MoveEndUntil vbCr
                End If

                'don't mark newline
                If Not .Text = vbCr Then
                    .InsertBefore "__"
                    .InsertAfter "__"
                End If

                .Font.Underline = False
            End With
        Loop
    End With
End Sub

Private Sub ConvertLists()
   Dim para As Paragraph
    For Each para In ActiveDocument.ListParagraphs
        With para.Range
            .InsertBefore " "
            For i = 1 To .ListFormat.ListLevelNumber
                If .ListFormat.ListType = wdListBullet Then
                    .InsertBefore "*"
                Else
                    .InsertBefore "#"
                End If
            Next i
            .ListFormat.RemoveNumbers
        End With
    Next para
End Sub


Thursday, November 26, 2009

How to change the computer name?

Linux :

edit /etc/hostname file

Redhat :

edit /etc/sysconfig/network

change the hostname = xx

- Mihir Patel.


restart the redhat machine from command prompt

/sbin/shutdown -r 0

will restart the machine on the spot.

- Mihir Patel.


Usage:    shutdown [-akrhfnc] [-t secs] time [warning message]
                  -a:      use /etc/shutdown.allow
                  -k:      don't really shutdown, only warn.
                  -r:      reboot after shutdown.
                  -h:      halt after shutdown.
                  -f:      do a 'fast' reboot (skip fsck).
                  -F:      Force fsck on reboot.
                  -n:      do not go through "init" but go down real fast.
                  -c:      cancel a running shutdown.
                  -t secs: delay between warning and kill signal.
                  ** the "time" argument is mandatory! (try "now") **


Wednesday, November 11, 2009

how to compare or diff the word files

Diff doc is the tool that can be used.

http://www.softinterface.com/MD/Document-Comparison-Software.htm

I found it only effective for small size word files, this tool is much better then Winmerge for word documents.

- Mihir Patel.

how to create hp recovery cd \ DVD \ Restore Disks

Steps:


  1. Click Start>All Programs>Recovery Manager.

  2. Select Recovery Manager. This will open Recovery Manager.

  3. Click Advanced Options. If you are using a laptop and operating on battery power alone you must connect to an AC power outlet before you can go to the next step.
  4. Select Recovery disc creation. Click Next. The Recovery Manager will begin creating the necessary files. This may take a while, so be patient until the bar has reached 100%.
  5. Read the table of requirements that appears. Depending on the type of discs you use, more or less may be needed; if you use ordinary CDs, Recovery Manager will require more compared to fewer discs if DVDs are used.

  6. Insert your first blank disc, having made sure it is fully labeled, such as "Recovery Disc 01" or "Recovery Disc 1 of 2". The optical drive of your computer will have automatically opened. If not, open manually. Close the optical drive and click Next.
  7. Understand and confirm you want to go through with the operation using the type of disc you have inserted by clicking Next.

  8. Wait while Recovery Manager now creates the first disc. This may take 20-40 minutes as it collects the files, writes the files and verifies the files to disc.
  9. Remove the disc and insert the next after the first has been finished after clicking Next. Continue the creation of discs according to the necessary requirements, up until the last has finished creating files.

  10. Click Next after removing the disc and then Finish to complete the session. Congratulations! You have just made yourself a set of recovery discs.
  11.                                                                                                 
    Use the recovery discs to recover your computer in case of system instability or failure.


Tips

  • The number of discs you will need, whether CDs or DVDs, is highly variable across all computers. Do not take the table of requirements for granted.
  • Remember, if using a laptop you must be connected to an AC power outlet to create recovery discs.
  • Be sure to label all discs in numerical order as they are created. If the time comes when your computer has crashed, and you don't know the order in which your recovery discs are to be inserted, your system may be in very big trouble.
  • You will need high-quality CD-R, DVD-R, DVD-R with double-layer support, DVD+R, or DVD+R with dual-layer support discs (all discs purchased separately with computer).
  • Re-Writable discs (RW) are not compatible with the Recovery Manager software.
  • Permission may have be sought from the computer administrator (unless you are one) in order to start creating recovery discs.
  • These instructions are based on a Compaq Computer with Windows Vista, and are not intended for previous versions of Windows such as XP.
  • Sony's recovery disc creator is in a bit more unusual spot. Look in the Help & Support menu to find the recovery disc creator.
  • Acer has a program called Acer eRecovery. This will do the same thing.
  • In Acer, there is an option to restore to factory default without making a restore disk. At startup, push one of the following: [F10, CtrlF10, CtrlF10 while tapping]. One of these will start the Acer eRecovery screen which allows you to restore your system.

Warnings

  • Only one set of recovery discs can be made per computer, so do not lose them. Handle the discs carefully and keep them in a safe place.
  • However, the set you make can be copied. Keeping the originals in a safe location, while keeping copies with the laptop while traveling could be very useful to restore the system if major problems happen away from home. Students who study far from home could particularly benefit from the idea that restore disks might be necessary to use their computer after a virus wipes it out.

Things You'll Need

  • A computer
  • OS (operating system) of Windows Vista
  • High-quality discs
  • A Compaq or HP computer with Recovery Manager
  • A CD or DVD burner


Tuesday, November 3, 2009

Allow not compatible extensions in Firefox

The last version of firefox is out, but an extension that I use daily (QuickProxy) has not been updated yet. In fact, it should work but it is considered ‘not compatible’ by firefox and thus, is automatically de-activated.

The workaround (at your own risks !) is to bypass the security that enforces the compatibilty of extensions.

  • Open firefox and enter  “about:config” in the URL bar.
  • Right click in the page, then “new->boolean”
  • enter “extensions.checkUpdateSecurity” as the preference name in the dialog
  • set it’s value to false.
  • Create a similar entry called “extensions.checkCompatibility” set to false too.

Be careful when testing unsupported extensions, you may want to activate them one by one ! However do not hesitate to try, I have been able to succesfully use QuickProxy this way for more than a month….

For the record, the list of all the about:config options of firefox.

Ref : http://demeringo.ovh.org/blog/


Solution : Eclipse Galileo 3.5 + Proxy settings

I installed eclipse 3.5 at my work place (where we access internet through an authenticated NTML proxy).  I was unable to make eclipse pass through this proxy, which prevented me to install updates and additional software.

Anthony Dahanne’s describes the workaround on his blog (in french). The Apache httpclient implementation should be disabled because it doesn’t work well with NTMLv2 proxies.

For NTLMv2 Proxies, that require user name and password for access the workaround is to

  1. Disable the ECF httpclient provider.
  2. Provide the NTLMv2 proxy authentication info (proxyhost, domain, username, and password)

In practice, edit your eclipse.ini file to append the following properties.

-Dorg.eclipse.ecf.provider.filetransfer.excludeContributors=org.eclipse.ecf.provider.filetransfer.httpclient
-Dhttp.proxyPort=8080
-Dhttp.proxyHost=myproxy
-Dhttp.proxyUser=mydomain\myusername
-Dhttp.proxyPassword=mypassword
-Dhttp.nonProxyHosts=localhost|127.0.0.1

Ref : <a target="_blank" href="http://demeringo.ovh.org/blog/?p=103">http://demeringo.ovh.org/blog/?p=103
</a>


Thursday, October 1, 2009

Sony Ericsson G502 $99 from Three Online or DSE and FREE UNLOCKING!

A nice little quality phone from Sony Ericsson
Features:

  • HSDPA fast Mobile Web access
  • RSS reader for web updates
  • 2.0 megapixel digital camera
  • FM Radio
    * Expandable Memory up to 4GB

Full Spec: http://www.gsmarena.com/sony_ericsson_g502-2350.php

Video Review: http://www.youtube.com/watch?v=5jFih7IBD64

Three online store started charging p&h fee $10 and moneybackco offers you the same amount as well.

Try to get it from Three dealer Shop or DickSmith, which will cost you only $99 and you can choose between RED and SILVER.

DickSmith link: http://search.dse.com.au/search?w=3+Prepaid+Sony+Ericsson+G5...

Remember this is a 3 Network locked phone. UNLOCK it for FREE @ http://www.aerix-group.com/supported_phones.html

Unlock HowTo: http://www.seusers.com/forum/aerix-free-unlock-a2-platform-2...

I’m not sure about the package content. If it does not come with a USB cable get it from DX.

Required Cable: DCU 60 US $ 3.46 @ http://www.dealextreme.com/details.dx/sku.2242


Ref : http://www.ozbargain.com.au/node/17211


Thursday, September 24, 2009

Live NSE and BSE Stocks rolling on your Desktop screen

Download BSE Market WAtch

Download NSE Ticker


Bombay Stock Exchange

Get BSE and NSE live on your desktop by just few clicks.Through various means and medium, BSE always keeps you updated with market information. Market Watch is  new initiative, to provide you key information right on your desktop and medium to suit your desk.Market Watch is a desktop tool that keeps you to connect to the market and get latest updates live.
                                    Market Watch gadget keeps you updated with latest SENSEX and market trends on a minute-to-minute basis.Market Watch can also takes you directly to live reports on bseindia.com.Market Watch can also float anywhere on your desktop making it comfortable to use while working.


National Stock Exchange-

You can get NSE Live very easily just download NSE Ticker and NSE Share Price will scroll on down side of your desktop, Just like this. By clicking any share price you will get full detail of particular share.Nifty Live keeps you updated with the latest market trends and share prices along with loss and gain  


- Mihir Patel

Wednesday, September 16, 2009

how to enable / disable macros in word 2003 or word 2002

To work around this behavior, close the document and change the macro security level to Medium. To do this, follow these steps:
  1. On the Tools menu, click Options and then Security then click Macro Security.
  2. On the Security Level tab, click to select Medium, and then click OK.
  3. On the File menu, click Exit to quit Microsoft Word.

    NOTE: Though there is no warning message telling you to restart. You must quit and restart Microsoft Word for the security level change to take effect.
This sets the security level to Medium. You will see a prompt to enable or disable macros when you reopen the document.

- Mihir Patel

Ref : http://support.microsoft.com/kb/290949

Friday, September 11, 2009

Remote Administrator [RADMIN] Client & Server

radmin

Radmin – fast and reliable pc remote control software for secure networking. Remote Administrator (Radmin) is the award-winning secure remote control software that enables you to work on a remote computer as if you were sitting in front of it. This program is the ideal remote access solution. You can access the same computer from multiple places and use advanced file transfer, remote shutdown, Telnet, OS-integrated NT security system support and other features. Radmin outperforms all other remote controls in speed, reliability and security!

radmin


Thursday, August 6, 2009

How much cash can i carry to India ?

According to the Central Board of Excise and Customs

(iii)       Declaration of foreign exchange/currency has be made before the custom officers in the following cases :
      (a)     where the value of foreign currency notes exceed US $ 5000 or equivalent
      (b)     where the aggregate value of foreign exchange including currency exceeds US $ 10,000 or equivalent


WARNINIG:

6. Import of Indian currency is prohibited. However, in the case of passengers normally resident of India who are returning from a visit abroad Indian currency upto Rs. 5000 is allowed.

Ref : http://www.cbec.gov.in/travellers.htm

- Mihir Patel.

Friday, July 31, 2009

Solution : How to batch covert image files to diffrent file format?

Download the ImageMagick from

http://www.imagemagick.org/script/binary-releases.php

and run the following command
mogrify -format jpg *.png
it will convert files of x format to y , above command will convert all the png files to jpg format

- Mihir Patel.


Solution : Error: Could not extract bounding box from .eps!

remove the latex file generation from doxygen. or else include the following packages
texlive texlive-pdf texlive-latex-extra
or install  (if on windows)

It is possible to use latex to produce formulas.  There are already some examples of this in the CalRecon code.  When using doxygen to produce documentation where latex commands are included, latex must be available on the system.  This is typically the norm on UNIX machines, however, on Windows this is a different matter.  There is a freely available version of latex available for Windows, MiKTeX:
http://www.miktex.org/
The Doxygen manual states the following:

Make sure the tools are available from a dos box, by adding the directory they are in to the search path.  For your information, the LaTeX is freely available set of so called macros and styles on the top of the famous TeX program (by famous Donald Knuth) and the accompanied utilities (all available for free). It is used for high quality typesetting. The result – in the form of so called DVI (DeVice Independent) file – can be printed or displayed on various devices preserving exactly the same look up to the capability of the device. The dvips allows you to convert the dvi to the high quality PostScript (i.e. PostScript that can be processed by utilities like psnup, psbook, psselect, and others). The derived version of TeX (the pdfTeX) can be used to produce PDF output instead of DVI, or the PDF can be produced from PostScript using the utility ps2pdf.

If you want to use MikTeX then you need to download the fancyhdr package separately. You can find it at:
ftp://ftp.tex.ac.uk/tex-archive/macros/latex/contrib/supported/fancyhdr/


- Mihir Patel

Solution : Problems running dot: exit code=-1, command='dot' + Doxygen

As I used Doxygen to generate source code docuemt, I failed to generate graphs and got this kind of error message: Problems running dot: exit code=-1, command='dot', arguments='"classcom_1_1htc_1_1hr_1_1tree_1_1_department_table_bean_50f82c9386b01669779a1524b380b355_cgraph.dot" -Tpng -o "classcom_1_1htc_1_1hr_1_1tree_1_1_department_table_bean_50f82c9386b01669779a1524b380b355_cgraph.png"'


Solution to this issue is to restart the eclipse after installing the "graphviz-x.msi".

Basically the path linking is the poblem.

To test that the installtion of the package is successful run the
dot --v
command at the command prompt. if you see nay text that means the installation is successful. To let the eclipse the path up for running the dot you need to restart the eclipse for the first time after installation.

- Mihir Patel.

Thursday, July 30, 2009

Re-organize your desktop : In a click -> with Fences

awesome program : this will make your desktop clear. check it out.

Website : http://www.stardock.com/
Download : http://www.stardock.com/products/fences/

It's totally free. give it a go !!

Note : - Enable the double click feature. This will switch desktop in clear/ icon mode !!

- Mihir Patel

how to test the newly created sata driver integreated cd with WinXp ?

1. Install the Virtualbox (http://www.virtualbox.org/)
2. Create new  virtual machine with Os type as MS Windows .. Version WinXP
3. Leave default setting for ram
4. boot hard disk ( primary master ) .. create a new hard disk
5. all default settings.. click next.
6. click on the virtual machine and select settings
7. go to hard drive and ( select "Enable the Additional Controller")
8. click on the "IDE Primary Master"  and select the "Sata Prot x" from the drag list
9. select CD/DVD ROM and point it to your newly created iso/ CD
10. click ok
11. start your virtual machine.

(NOTE : if you select your default disk in step 9 it will show you that no sata drivers can be detected. when you put the iso with integrated drivers. it should just work.)

- Mihir Patel


Extracting SATA driver from their EXE without Floppy Disk(FD) drive.

Options:
Obiously, you don't have any option to use Floppy Disk.


Materials needed:

1) SATA drivers(from your respective chipset manufacturer website, for me it's intel http://downloadcenter.intel.com)
2) WinImage(30 days trial copy from http://www.winimage.com)


Steps:
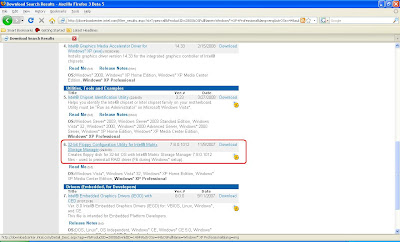
1) Download the intel SATA drivers. Make sure you get the correct file by downloading something called "Floppy Configuration Utility".


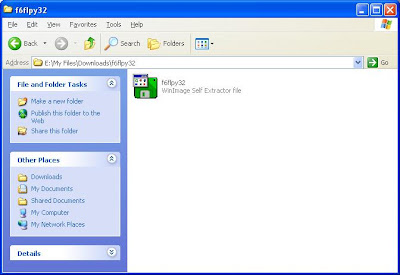
2) Extract the file and you will get green icon "f6flpy32".


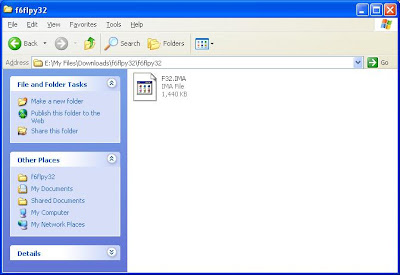
3) Extract the "f6flpy32" again and you will get this a file with .IMA extension.


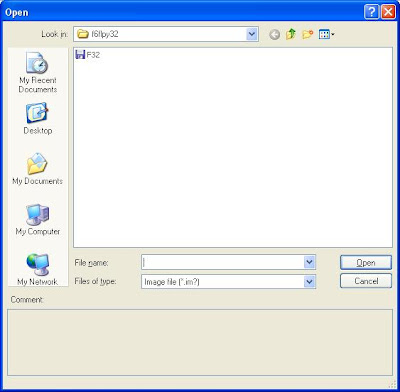
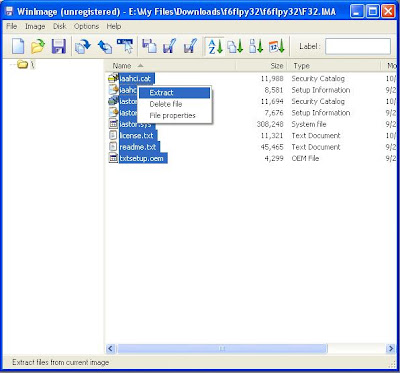
4) Ok, now you need to open up WinImage and browse to the latest extracted folder "f6flpy32" to load the .IMA file.


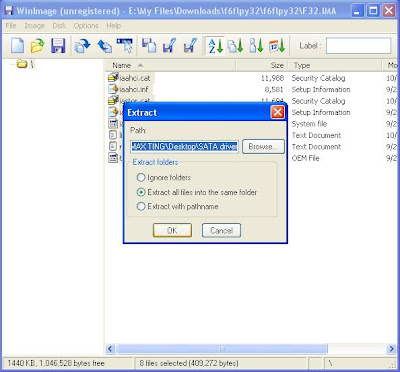
5) TATA, you will see all the SATA driver files needed for slipstreaming WinXp using nLite. Before you can use them, extract them to any folder(I name it "SATA driver" on my desktop) by selecting all of the files and choose "Extract".


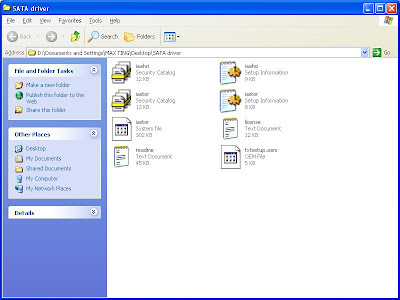
6) You will be prompted, choose "Extract all files into the same folder".


7) If you open up the "SATA driver" folder, the content is exactly the same with the content Floppy Disk. The difference is that you don't need a FD.


Proceed to?

A) Guide for "Slipstreaming SATA driver into WinXp boot cd using nLite"

Ref : http://maxeasyguide.blogspot.com

Shrink Vista Partition for WinXp Installation

Options:
A) If you have an available partition for WinXp installation, go to "WinXp Installation".


Materials needed:
1) PerfectDisk 2008(30 days trial version, download here).


Steps:
*make sure you backup the drive you going to shrink just in case anything goes wrong.
1) In Windows Vista, go to "Start", right click on "Computer" and choose "Manage". You will be prompted, just click "Continue".


2) Click on "Disk Management" and you will see the information of your hardisk installed.


3) Right click on the "VistatOS" drive, in my case it's "(C:)" and choose "Shrink Volume...".

4) By default Vista will give you the largest amount of space that you are able to shrink, it's not the free space that you have on that drive. Why?(If you want to find out, please refer to Query 1 or you are satisfied with the amount of space that you can shrink, just proceed to Step 5).


*Steps below followed after I use "PerfectDisk 2008" to empty more usable space for my XP drive. Need help on it? Go here: Get more usable space out of free space using PerfectDisk 2008
5) Please input the amount of space(in MB) for the new drive and allocate wisely, as you need to take into consideration of programs that you will install on this new drive, data storage and so on. I input "1000"(in MB) then only you click "Shrink".


6) Wait for new partition to be created. Then right click on it to choose "New Simple Volume...".


7) Click "Next".


8) Click "Next".


9) Now assign the drive letter(for my case, it's F).


10) Input the "Volume label" as "WinXp" for easy identification later and check "Perform quick format" as well.


11) Choose "Finish" and you have a new partition ready for WinXp installation. Proceed to normal WinXp installation procedure.


Proceed to?
A) If you have an empty partition for WinXp installation, proceed to "WinXp Installation".

Ref : http://maxeasyguide.blogspot.com